Creating an Email Template
Description
The following procedure assumes that the developer has opened the form in the Form Editor. Follow these instructions to create an email template similar to that used by the action script called by Button6 on the Inventory form:
Open the Invoice form in data entry mode.
Click Tools > Email....
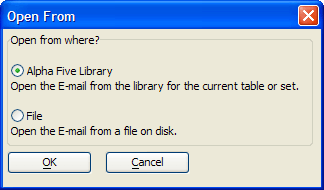
To open an existing email template.
Click Open Draft (the 'open folder' icon).
Click OK in the Open From dialog box.
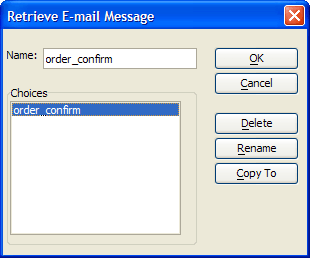
Select the template in the Choices list and click OK.
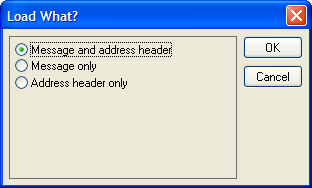
Select Message and address header in the Load What? dialog box and click OK.
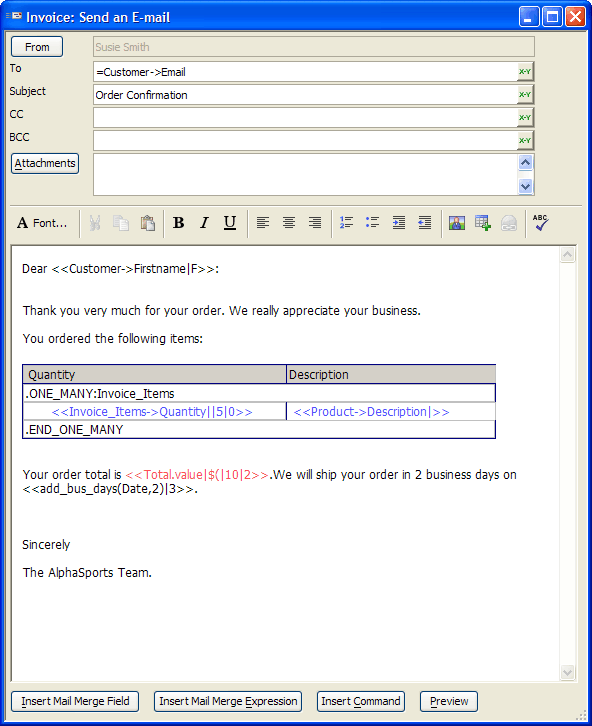
Click the 'xy' button in the To field and select "Email" from the Customer table. This result should look like this:
=Customer->Email
Enter "Order Confirmation" in the Subject field.
In the email body type "Dear ". Click Insert Mail Merge Field and select "Firstname" from the Customer table. Click Insert Field and Close.
Type ":", two new line codes, and the two lines of constant text shown below. The results should look like this:
Dear <<Customer->Firstname|F>>:
Thank you very much for your order. We really appreciate your business.
You ordered the following items:
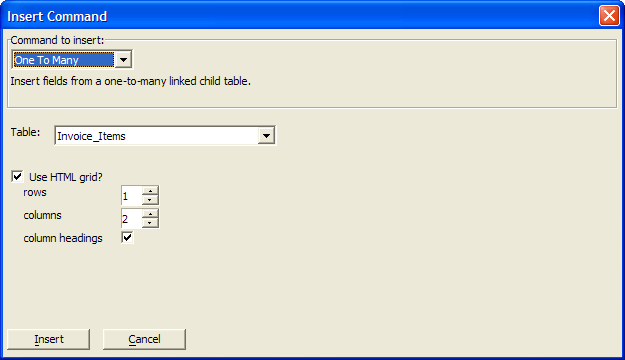
The email template does not support HTML coding.Click Insert Command. In the Insert Command dialog box:
1. Select "One To Many" in the Command to insert list.
2. Select "Invoice_Items" from the Table list.
3. Select 1 in the rows spin box.
4. Select 2 in the columns spin box.
5. Click Insert.
The following table and code appears in the body of the email.

Change the column titles.
1. "Column 1" becomes "Quantity".
2. "Column 2" becomes "Description".
3. Change their type faces to Arial 10 point.
4. Align them left.
5. Change the background of these cells to light gray.
6. Change the cell border width to 1.
7. Change the dark border color to dark blue.
Select the text of the first column of the third row:
1. Click Insert Mail Merge Field to select and format the Quantity field from the Invoice_Items table.
2. Click Insert Field.
3. Select the mail merge field and change its color to blue.
Select the text of the second column of the third row:
1. Click Insert Mail Merge Field to select the Description field from the Product table.
2. Set the Quantity field to have five characters but no digits after the decimal point.
3. Click Insert Field and click Close.
4. Select the mail merge field and change its color to blue.
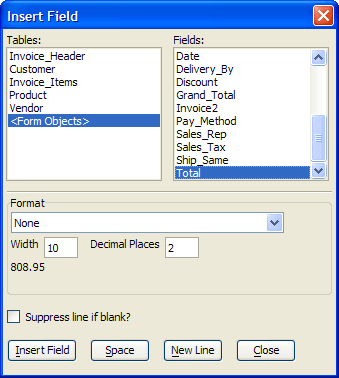
After the table, type "Your order total is " and click Insert Mail Merge Field. Select "<Form objects>" from the Tables list and "Total" from the Fields list. Click Insert Field and Close.
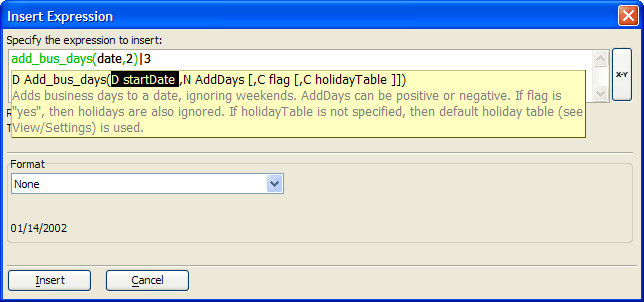
Type ". We will ship your order in 2 business days on ". Click Insert Mail Merge Expression. Enter the following expression: add_bus_days(Date,2)|3. In this case, the add_bus_days() function adds 2 days to the contents of the Date field and formats the result as DD-MONTH-YYYY. Click Insert.
The result should look like this:
Your order total is <<Total.value|$(|10|2>>. We will ship your order in 2 business days on <<add_bus_days(Date,2)|3>>.
Add the remaining fixed text and the result should look like this:
 Netmailer does not use the email templates created through this process.
See Also